Store and enjoy Music With Synology NAS – Audiophile Music

Store and enjoy Music With Synology NAS

Network attached storage (NAS) is a centralized server that allows multiple users to store and share files over a Transmission Control Protocol/Internet Protocol (TCP/IP) network through wifi or an Ethernet cable. NAS provides an affordable and easy-to-maintain network storage option.

Synology Inc. is a Taiwanese corporation that specializes in network-attached storage appliances. Synology has offices all over the world such as USA, UK, Germany, Japan…NAS Synology provides a centralized location on a network to store data. A Synology NAS goes beyond that, enabling you to build a private cloud to store, access, back up, and share files freely and securely.

Synology Nas is used for many purposes, we are only talking about storing and enjoying high quality music with Synology Nas. Once you’ve built your NAS system, install Audio Station to enjoy music anytime, anywhere on multiple network connected devices.

1. Install Audio Station

Login DiskStation Manager (DSM), then Go to Package Center and find Audio Station. Click Install.
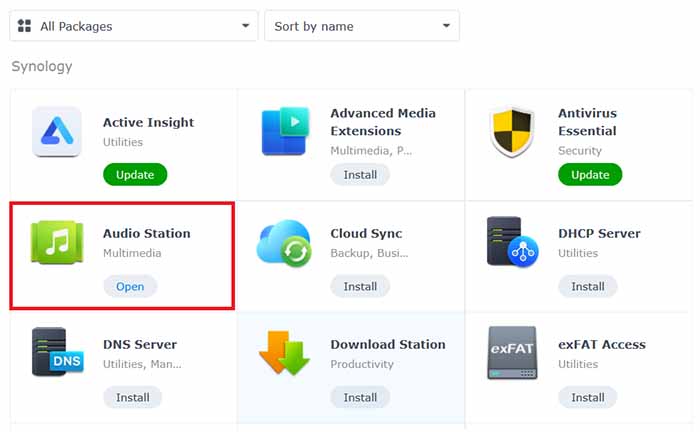
Install Audio Station

Once the app is installed, a shared folder named Music will be automatically created in File Station. This is the default shared folder for Audio Station, and the app will only accept all the music in this folder.

2. Store Audio Files to music folder

Go to File Station > music and click Upload
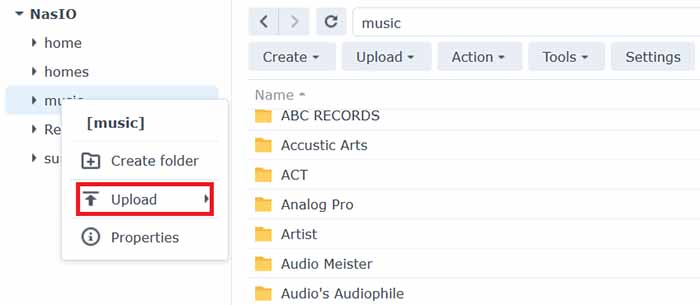
Store Audio Files to music folder

Select the files of folder albums you want to upload to your music folder from your local computer.

3. Play music on computer

Next, you can click on each folder, select each song that you want to play on the device you want to listen to. If your house has several DLNA standard audio systems, connected to the same LAN, it will display that many devices for you to choose to play.
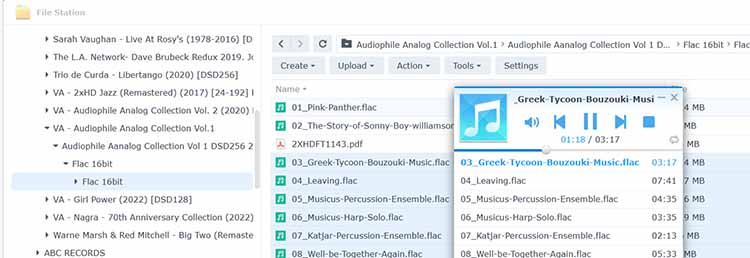
Play music on computer

4. Browse Music

If you want to be able to access and browse your music files when you are not in your local network, you are recommended to enable QuickConnect at Control Panel > External Access > QuickConnect. If you do not have a Synology Account, you can set one up within minutes and then give your DiskStation a QuickConnect ID. With this option enabled, you can now log into DSM and access your music from anywhere.
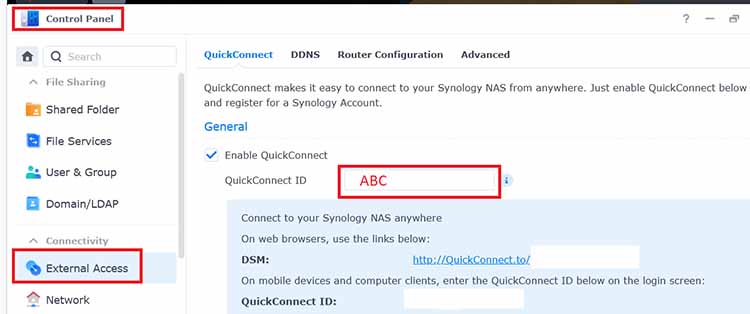
Browse Music
Browse Music

5. Play Music on Mobile Devices

You can use your QuickConnect ID to log into DS audio to .DS audio runs on iPad/iPhone/iPod touch, and Android devices. The app is available for free on Apple App Store and Google Play

Login to DS Audio > Enter IP address or Quickconnect ID of the NAS > The NAS Account > The NAS Pasword

Select songs, genre, artist, or album and enjoy.
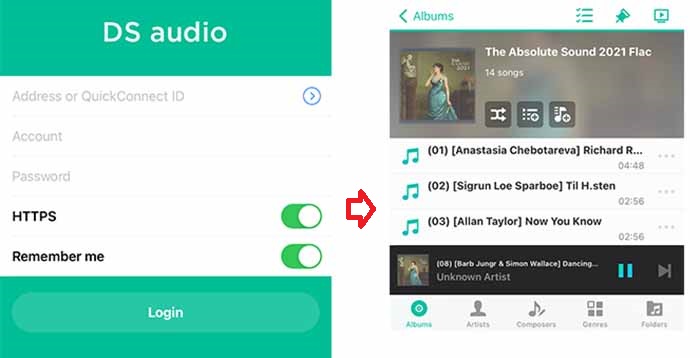
Play Music on Mobile Devices
If you already have a Synology NAS system and want to download high quality music (Hi-res and DSD) to copy to your NAS system, please Contact us here.


Convert Wav to Mp3 or all PCM audio formats

Convert Wav to mp3 or all PCM audio formats

1. Why do you need to convert wav to mp3 format:

It is for the purpose of reducing storage space or compatibility with the music player on your device.

2. What software do you need?

I was really impressed with Switch Audio File Converter and today I will mention it.

3. The outstanding functions of Switch Audio File Converter:

  • It allows conversion between most popular audio formats such as WAV, MP3, MP2, WMA, M4A, OGG, AVI, FLAC, MOV, AMR, AAC, AU, AIFF.
  • Convert multiple files and formats with simple drag and drop operations.
  • WAV encoder and flac converter support many sample rates.
  • Fast speed, good quality and simple operation.

4. How to convert wav to mp3 or all PCM audio formats:

To do this, follow these simple steps:

Step 1: Download Switch Audio File Converter Softwware, and open it

For Window and  For Mac

Step 2: Open files or folder if you want to convert

Once your files have been added, if you wish to remove any of them, select the files and either click the “Remove” button, or select File -> Remove from the menu.

Step 3: Choose where you want to save the file

“Save to Folder”, where you can enter the file directory into which you wish to store the converted files.

Step 4: Choose the Out format and Encoder options you need

Once you have selected a format to convert to, you can click the “Encoder Options” button to configure the settings for the format

Step 5: Click Convert -> to proceed

If you hit the convert button without any files selected, all files in the list will be converted by default.

Audio Format PCM And Which One Is Right For You

Hope above information can help you, Thank you for your attention!

How to convert Sacd to PCM, DSD and convert DSD to PCM format

How to convert SACD to PCM and DSD format or convert DSD to PCM format is a question that many digital music players ask.

Convert SACD to PCM and DSD format or convert DSD to PCM format for the purpose of reducing storage space or compatibility with the music player on your device.

Convert SACD to PCM and DSD format

To do this, follow these simple steps:

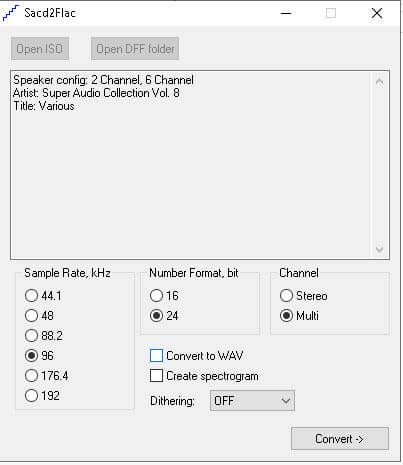
Step 1: Download Sacd2Flac Softwware, exact files and run sacd_gui2.exe

Sacd2Flac Softwware

Step 2: Open Sacd-Iso file or DFF folder if you want to convert

Then choose the parameters you need: Sample Rate/Bit/Channel (CD:44.1khz/16bit/Stereo). Check Convert to WAV if you want to convert to wav format, otherwise flac format is the default.

Step 3: Click Convert -> to proceed

The software for sound quality after conversion is very good, so it will take your time a lot.

Refer how to convert Converter SACD ISO to DSD format

Note:

  • Files after conversion is located in the same software folder.
  • There are many ways to do this but the software I instructed for sound quality is quite good, you can rest assured to use.
  • If finance is not a big problem for you then you should use AuI ConverteR 48×44 software. It is a great choice because of its sound quality.

Convert DSD to PCM format

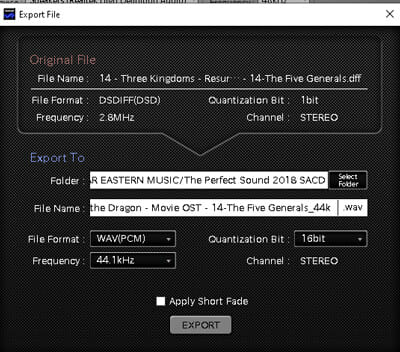
Use Sacd2Flac software to converting DFF (DSD) format to PCM

Use TASCAM Hi-Res Editor software to convert DSF (DSD) format to PCM format

DSD to PCM

The way to use TASCAM Hi-Res Editor software is very simple. It is free, but the sound quality is very good. Its disadvantage is that it only allows one file to be converted at a time.

If you are still confused about audio formats, please read this article to know more about them.

Hope above information can help you, Thank you for your attention!

How to Convert SACD ISO to DSD Files- Audiophile Music

How to Convert SACD ISO to DSD Files

If you have an SACD ISO image and want to extract the high-resolution DSD tracks for playback on a computer, music server, or compatible DAC, ISO2DSD is a simple and convenient tool for the job.

This guide explains how to convert an SACD ISO file into individual DSD files, with recommended settings for maintaining metadata and choosing between stereo and multichannel tracks.

What Is SACD and DSD?

SACD (Super Audio CD) is a high-resolution optical audio format introduced in 1999 by Sony and Philips as an alternative to conventional Compact Disc (CD).

Unlike standard CD-DA, which uses 16-bit/44.1 kHz PCM audio, SACD uses DSD (Direct Stream Digital) technology.

DSD uses a high sampling rate and a 1-bit audio stream to represent the audio signal. SACD commonly contains DSD64, with a sampling rate of 2.8224 MHz.

For audiophiles, extracting the original DSD stream from an SACD ISO can be useful for computer-based playback, music servers, and compatible DACs.

What You Need

Before starting, you need two things:

1. Java Runtime

Java is required to run ISO2DSD. Download Java

2. ISO2DSD Tool

ISO2DSD is a tool that can extract DSD audio tracks from an SACD ISO image. Download ISO2DSD

After downloading ISO2DSD, extract the files and run:

iso2dsd_gui.exe OR iso2dsd_gui.jar

How to Convert SACD ISO to DSD

Step 1: Install Java Runtime

Download and install the Java Runtime Environment from the official Java website.

After installation, you can proceed to ISO2DSD.

Step 2: Download and Run ISO2DSD

Download ISO2DSD and extract the ZIP or archive to a folder.

Then open:

iso2dsd_gui.exe OR iso2dsd_gui.jar

No traditional installation is required for ISO2DSD.

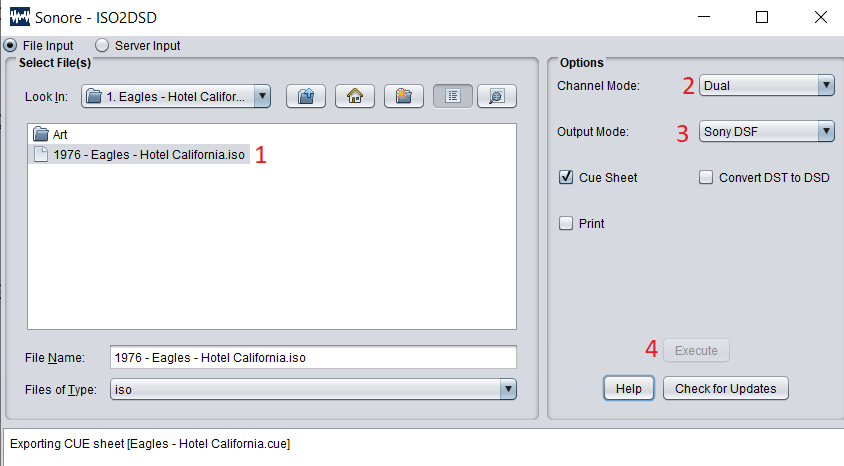
Step 3: Select Your SACD ISO File

In the ISO2DSD window, go to the Select file section.

Click Look in and select the SACD ISO file you want to convert.

ISO2DSD will read the contents of the SACD image and make the available tracks accessible for extraction.

Step 4: Configure the Output Options

Go to the Options section and choose the appropriate settings.

Convert SACD iso to dsd files

Channel Mode

Choose the channel configuration you want to extract:

  • Dual – Stereo tracks
  • Multi – Multichannel tracks, if available on the SACD

If you are creating files for normal two-channel stereo playback, select Dual.

Output Format

Select: Sony DSF DSF is generally the recommended choice because it supports metadata and tagging.

Convert DST to DSD

Leave Convert DST to DSD unchecked if your DAC or playback software supports DST decoding.

DST is a lossless compression format used on some SACDs. It can reduce the DSD data size significantly while preserving the original audio information.

If your playback software or hardware does not support DST, enabling this option converts the compressed stream into an uncompressed DSD stream.

Step 5: Start the Conversion

After selecting your settings, click:

Execute

ISO2DSD will extract the selected SACD tracks and create individual DSD files.

The converted files are normally saved in the same folder as the ISO2DSD application.

DSF vs. DSDIFF

ISO2DSD can create different DSD file formats.

Sony DSF

DSF is generally the better choice for a music library because it supports metadata and tagging.

Album information such as artist, album title, track title, and other tags can be stored in the file.

Philips DSDIFF

DSDIFF is another DSD file format, but it has more limited tagging support in many music-management applications.

For this reason, DSF is usually the more convenient format for a tagged music collection.

Important Notes

If Sony DSF is selected, ISO2DSD can create tagged files when the SACD ISO contains the relevant metadata.

If Philips DSDIFF is selected, tagging support is more limited and metadata may not be preserved in the same way.

The resulting DSD files will be created in the output folder specified by ISO2DSD.

Also keep in mind that SACD ISO files can be very large. Make sure you have sufficient free storage space before starting the extraction.

How to Convert SACD to PCM

If your DAC or playback system does not support DSD, you may prefer to convert the SACD/DSD content to PCM.

For a detailed guide, see:

How to Convert SACD to PCM, DSD, and Convert DSD to PCM Format

Conclusion

Converting an SACD ISO to individual DSD files with ISO2DSD is relatively straightforward.

For most stereo music libraries, Dual + Sony DSF is a practical configuration because DSF provides broad software compatibility and supports metadata. If your playback system supports DST decoding, there is generally no need to enable Convert DST to DSD.

Once the conversion is complete, the resulting DSF files can be organized in your music library and played using compatible DSD software or hardware.

Foobar2000 – Best Of Media Player for Audiophiles

Foobar2000 is a free music player for high sound quality and extremely powerful.

It is quite popular by Lossless-fan because the sound that foobar exported is completely original. The two most outstanding advantages of Foobar2000 are the ability to read most Audio formats and the ability to customize the interface with the full functionality of a top music player.

This is open source software so you can add plugins, available skins or homemade skins.

Main features

  • Supported audio formats: MP3, MP4, AAC, CD Audio, WMA, Vorbis, Opus, FLAC, WavPack, WAV, AIFF, Musepack, Speex, AU, SND… and more with additional components. (SACD, APE, DTS…)
  • Converter  with over 300 different file formats to wav, flac, acc, mp3, opus …
  • Gapless playback.
  • Easily customizable user interface layout.
  • Advanced tagging capabilities.
  • Support for ripping Audio CDs
  • Full ReplayGain support.
  • Customizable keyboard shortcuts.
  • Open component architecture allowing third-party developers to extend functionality of the player.

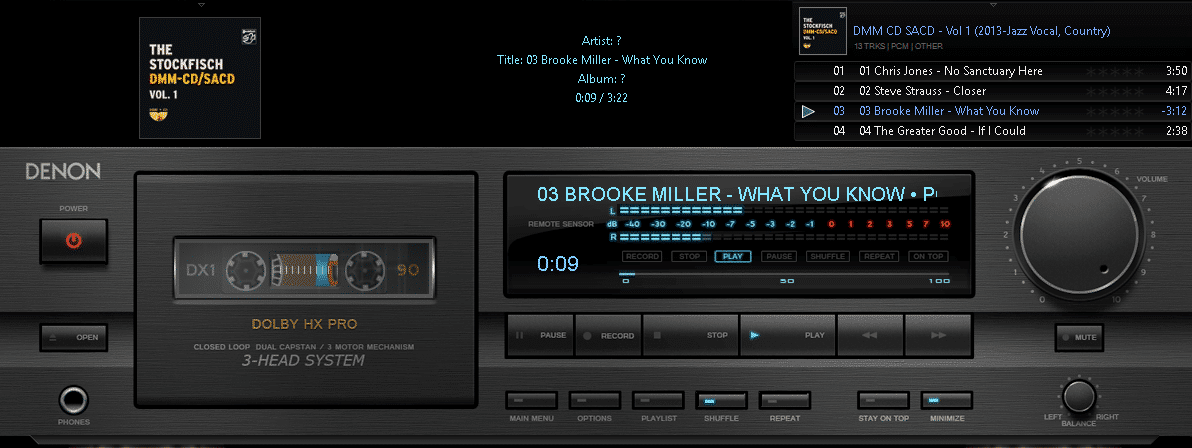
Skin Foobar 2000 Ver.1

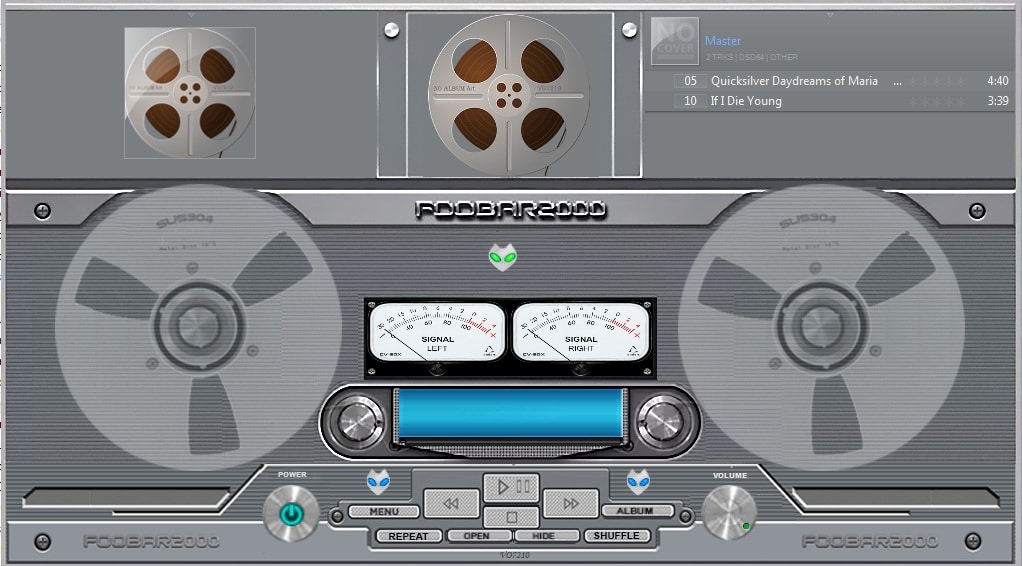
Skin Foobar 2000 Ver.2 reel to reel by vo7210

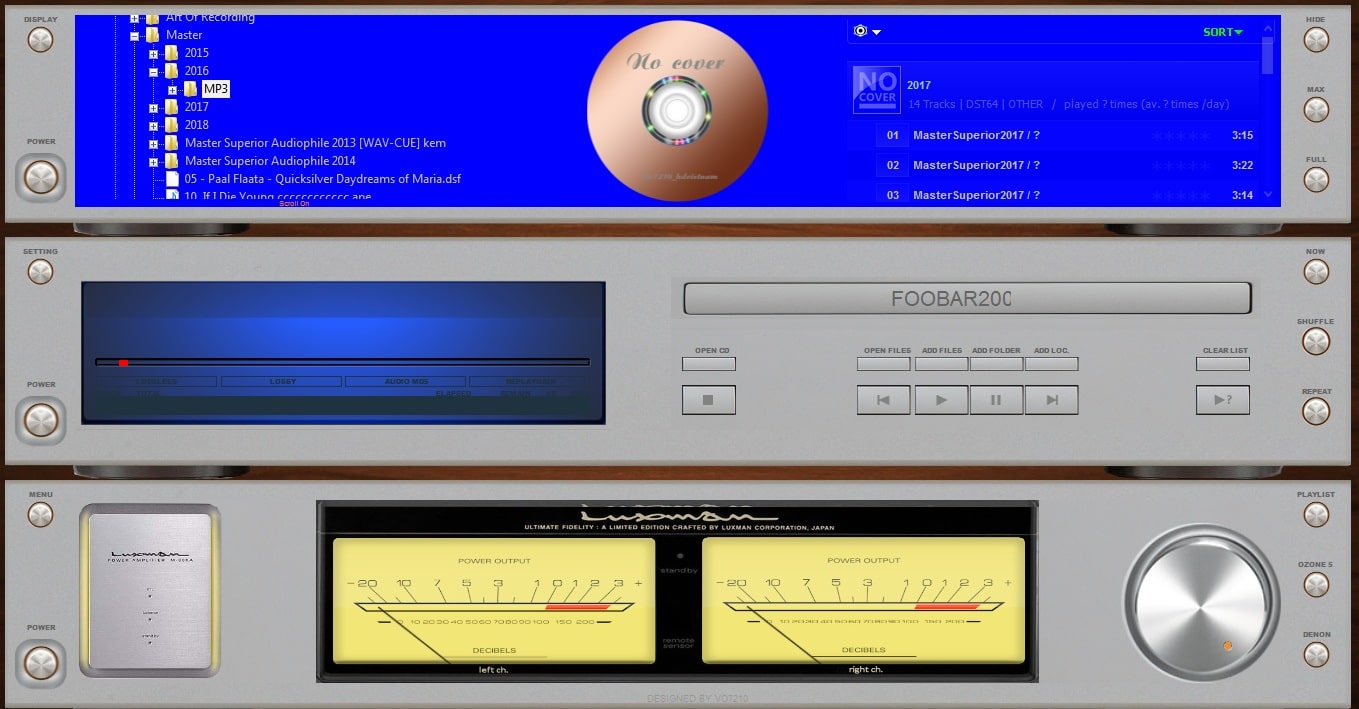
Skin Foobar 2000 Ver.3 Denon fix

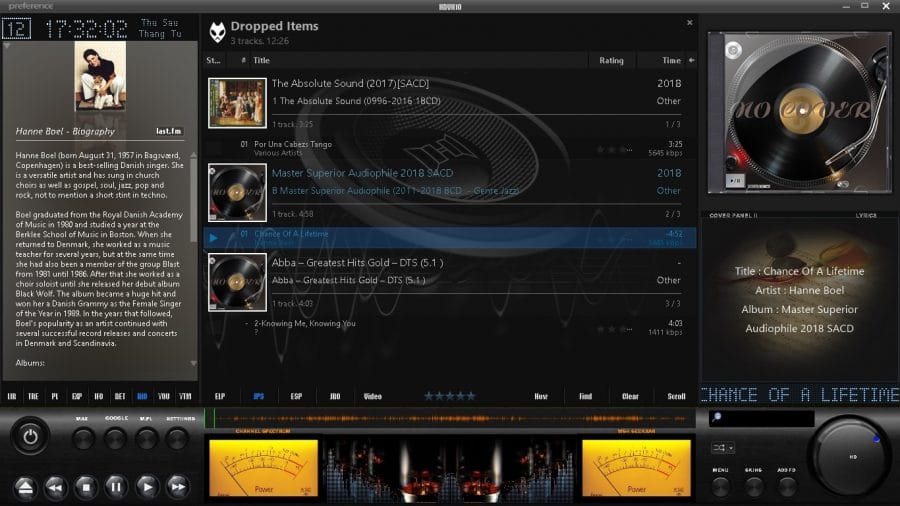
 Skin Foobar 2000 Ver.4 Sound system 2.0 by hdvietnam

Best Skin Foobar

foorbar2000

Other software JRiver Media Center

Thank you for your attention.